Info
Topologia
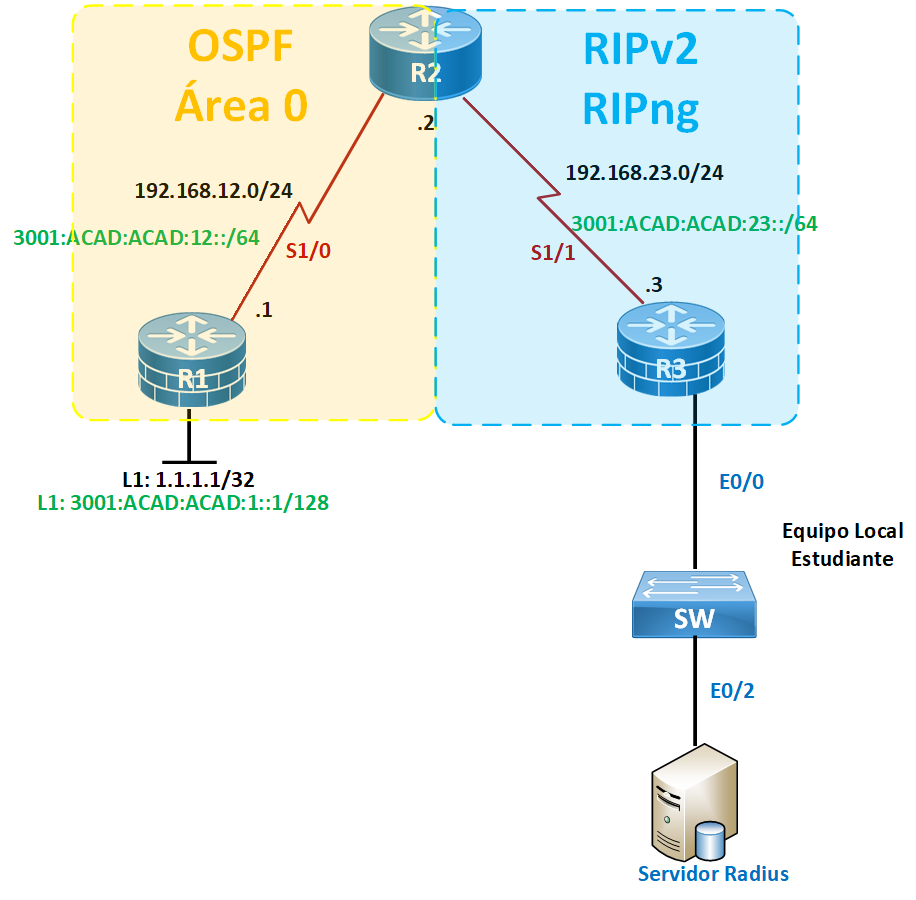
Sobre
Implementacion de Servicio Radius
Requerimientos
- Habilitar enrutamiento IGP en equipos correspondientes. Dejar interfaces pasivas.
- Permitir conectividad entre protocolos IGP.
- En router R1, crear vista que realice lo siguiente: Revisar tabla de enrutamiento, cambiar nombre del dispositivo, permita habilitar horario y habilitar protocolos de enrutamiento. Utilizar credenciales a elección.
- En router R2, crear un nivel de privilegio personalizado que realice lo siguiente: Revisar HW/SW de router, configurar IP en las interfaces.
- En router R3, deberá crear dos usuarios y contraseñas, los cuales deberán ser autenticados mediante servidor Radius. Realizar las configuraciones pertinentes en router y WinRadius. Compruebe el funcionamiento.
- En router R3, habilitar servicio syslog, que permita que los eventos queden almacenados en TFTP64.
Configuracion
SW2
enable
configure terminal
int range e0/0-2
duplex half
R1
enable
config t
router ospf 1
router-id 1.1.1.1
network 192.168.12.0 255.255.255.0 area 0
netowrk 1.1.1.1 255.255.255.255 area 0
passive-interface loopback 1
exit
ipv6 unicast-routing
ipv6 router ospf 1
router-id 1.1.1.1
passive-interface loopback 1
exit
int loopback 1
ipv6 ospf 1 area 0
exit
int s1/0
ipv6 ospf 1 area 0
end
!
show ip route ospf
!
show ip route ospf
!
ping 192.168.23.3
!
show ipv6 route ospf
!
show ipv6 route ospf
!
aaa new-model
enable secret perita
parser view VISTA1
secret cisco1
commands exec include show ip route
commands exec include configure terminal
commands configure include hostname
commands exec include clock set
commands configure include router ospf
commands router include network
end
!
Revisar View R1
enable view VISTA1
password: cisco1
show parser view
?
show ip route ?
configure terminal
?
router ospf 1
network ?
end
enable view
password: perita
R2
enable
config t
router ospf 1
router-id 2.2.2.2
network 192.168.12.0 255.255.255.0 area 0
exit
router rip
version 2
no auto-summary
network 192.168.23.0
exit
ipv6 unicast-routing
ipv6 router ospf 1
router-id 2.2.2.2
exit
int s1/0
ipv6 ospf 1 area 0
exit
ipv6 router rip PERON
exit
int s1/1
ipv6 rip PERON enable
exit
!
router ospf 1
redistribute rip subnets
!
exit
router rip
redistribute ospf 1 metric 1
exit
!
ipv6 router ospf 1
redistribute rip PERON include-connected
exit
!
ipv6 router rip PERON
redistribute ospf 1 include-connected
redistribute ospf 1 include-connected metric 1
exit
!
username USER15 privilege 15 secret cisco15
username USER2 privilege 2 secret cisco2
privilege exec level 2 show version
privilege exec level 2 configure terminal
privilege configure level 2 interface ethernet 0/0
privilege interface level 2 ip address
privilege interface level 2 ipv6 address
privilege interface level 2 no
line console 0
login local
exit
!
R3
NOTA: Se debe enrutar el segmento del virtualbox
NOTA: Si la interfaz no tiene IP, debido a que virtualbox le da ip, encender interfaz y poner ip address dhcp
enable
config t
router rip
version 2
no auto-summary
network 192.168.23.0
network 192.168.56.0
passive-interface e0/0
exit
!
ipv6 unicast-routing
ipv6 router rip PERON
exit
int s1/1
ipv6 rip PERON enable
end
!
show ip route rip
!
show ipv6 route rip
!
show ipv6 route rip
!
configure terminal
username user01 password cisco1
aaa new-model
radius-server host 192.168.56.1 auth-port 1812 acct-port 1813 key WinRadius
radius-server host 192.168.56.1 auth-port 1812 acct-port 1813 key WinRadius
aaa authenticaction login default group radius local-case
exit
!
Verificacion Usuario WinRadius R3
Nota: Muestras en el [[020 - Conceptos/020.4 - Dispositivos de Red/IOU WEB#Aplicaciones#WinRadius|WinRadius]] la evidencia de que la authentication OK
end
exit
!
username: user01
password: cisco
exit
!
username: user02
password: cisco
Verificacion Syslog TFTP64
logging on
logging host 192.168.56.1
logging trap 6
logging source-interface e0/0
int loopback 4